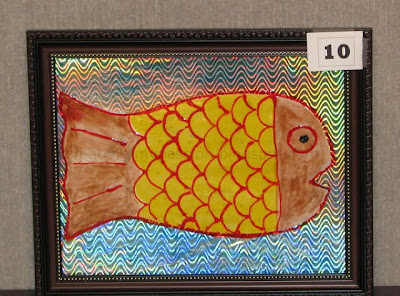
Sometime back I had a post about the Koinobori contest and our Rainbow fish koinobori flag. We had two more entries for the contest-koinobori glass painting and a paper-mache. The glass painting was done on an old picture frame by placing the koinobori pattern inside. This is an extremely child friendly art and a page from a coloring book can also be used for pattern.

Picture frame
Water Based Glass paint(you can also use sharpie permanent markers or acrylic paint or Washable Window markers)
Paint brush
Gift paper wrap
Construction paper(optional)
Place the pattern inside the picture frame just as you place a photo/picture

We used water based glass painting which is highly recommended for children and glass painting beginner. They are easily diluted with water and can be painted with a paint brush. Easy to clean and the paint dries fast. Now I'm not a glass painting pro or expert, I also feel comfortable using water based glass painting. Next project I'm thinking to use permanent markers instead of glass paint.
Fill in the colors as you wish


After CJ, filled in the colors, I drew the outline with a thinner paint brush dipped in glass paint. While drawing the outline, I little bit messed up the blue background. But it was so easy to correct using water. After the correction, CJ repainted the blue background.

To give a wavy background effect, I covered the picture frame cardboard with a silver gift wrap as shown below

Version 1 - I liked the below version of glass painting, Looks pretty neat rite!

But in the above version, the fish pattern/Koinobori is blending with the waves. To make the koinobori prominent(Contest! Contest!), I glued in construction papers to the wrong side of the picture frame glass

Version 2 - Koinobori Glass Painting!


Materials Used:
Picture frame
Water Based Glass paint(you can also use sharpie permanent markers or acrylic paint or Washable Window markers)
Paint brush
Gift paper wrap
Construction paper(optional)
Steps Overview:
Place the pattern inside the picture frame just as you place a photo/picture

We used water based glass painting which is highly recommended for children and glass painting beginner. They are easily diluted with water and can be painted with a paint brush. Easy to clean and the paint dries fast. Now I'm not a glass painting pro or expert, I also feel comfortable using water based glass painting. Next project I'm thinking to use permanent markers instead of glass paint.
The main advantage of using picture frame for glass painting is you need not draw the outlines and glass painting outliner is not needed. Ease of handling, no sharp glass edges
Fill in the colors as you wish


After CJ, filled in the colors, I drew the outline with a thinner paint brush dipped in glass paint. While drawing the outline, I little bit messed up the blue background. But it was so easy to correct using water. After the correction, CJ repainted the blue background.

To give a wavy background effect, I covered the picture frame cardboard with a silver gift wrap as shown below

Version 1 - I liked the below version of glass painting, Looks pretty neat rite!

But in the above version, the fish pattern/Koinobori is blending with the waves. To make the koinobori prominent(Contest! Contest!), I glued in construction papers to the wrong side of the picture frame glass

Version 2 - Koinobori Glass Painting!


What a great idea to paint on a frame... much easier to manage paint on a flat surface rather than an horizontal window!
ReplyDeleteMy kiddo enjoys glass painting too but so far only let her do it on plastic as was afraid of the glass edges-- your idea of the frame is good
ReplyDeleteCheers
Sonia
http://cardsandschoolprojects.blogspot.com
That look wonderful. Love the finished painting, but love the WHOLE PROCESS even more. Looks fabulous. Clever you!
ReplyDeleteThanks for joining Kids Get Crafty - always fab to have you there!
Maggy
Hi, to say thank you to you for being my newest follower I have a little surprise for you. Please pop over to my blog to receive your surprise. Karima :) http://www.karimascrafts.com/2011/09/i-received-blog-on-fire-award.html
ReplyDeleteLove it and it will be featured this week on The Sunday Showcase! See you this Sunday!
ReplyDeleteThanks Aimee!
ReplyDeletegreat project, thanks so much for sharing on Craft Schooling Sunday! I moved your project from the bottom of last week's party to the top of this week's party so more readers could see it. all the best!
ReplyDeleteThank you creativejewishmom!
ReplyDeleteWhat a neat idea! :)
ReplyDeleteLovely ... I normally buy frames from IKEA.. the real cheap ones to do this.. But the simple painting is a superb idea.. I think normally my painting is so complicated.. for the little ones.. that I land up doing this on my own. :-)
ReplyDeleteYeah Patricia, the IKEA frames are perfect for the project. They are light weight and more easy for the kids to handle!
ReplyDeleteI love how you're always trying out new techniques. The shimmery background looks great with the fish.
ReplyDeleteThanks for joining in with the Play Academy :)
Wow, your glass painting technique is incredible. What a beautiful piece of art!
ReplyDeleteThe way you told to create glass painting seems quite easy. From next time I will also try this to create my peice of art. Thanks for sharing.
ReplyDeletehttp://handicraft.indiamart.com/products/paintings/glass-paintings.html
lovely :) liked the idea of using photoframe
ReplyDelete