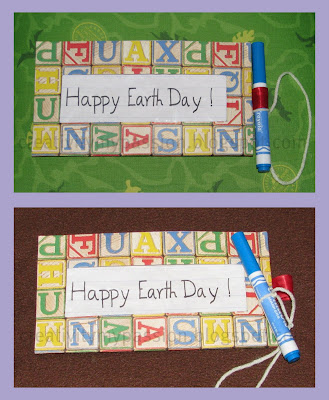
CJ loves tracing/writing on the writing practice sheets. She asks me to keep dots so that she can join them to create alphabets, my mom practiced her like that. But she always needs a fresh clean paper for this activity. Lots of paper used and I hate printing alphabet practicing sheets, just to be thrown in recycle bin. So I created a dry erase board from tissue paper box. The dry erase board is easy to handle, can be carried in the handbag/kids backpack/activity bag.

For some reason, CJ is fascinated by the dry erase markers. May be smooth feel while you write or May be the erasing activity with tissue makes her happy! So we have a set of dry erase markers and I just make sure the markers are low odor and non-Toxic.
CJ is quiet impressed with her new writing board. This morning she was writing, erasing, writing, erasing, more writing and more erasing! Isn't it fun! I started loving it, an inexpensive, $0 writing board!
This winter we have been sick with cold quiet often and we have lot of empty tissue boxes in store. Yay! we are recycling/reusing all of them and participating in the tissue box challenge!

Glue stick/Modpodge
Scissors
Vinyl bags/any clear plastic sheet(Vinyl bags work better)
Scrap book paper(optional)
Dry erase marker
Old dress tag/Ribbon(Optional)
Handwriting practice sheet/Old Magazines
Take an empty Tissue box

Pull out the sealed edges as shown in the below pictures


Cut along the line as shown below

You will get two parts, part1 with the opening and part2 - rectangular piece

Remove the plastic found around the opening on the top of the tissue box. It just comes off when we pull with hand

Cut a rectangle from the Vinyl bag/clear plastic sheet with dimensions little bigger then the rectangular opening of the tissue box.

Using glue stick, fix the clear sheet to the inside rectangular opening of the part1 as shown below

I added few strips of paper to the corners of the vinyl to give a neat finish

Place part2 rectangle piece over the backside of the part1 as shown below

Fix part2 in place by gluing the tabs as shown below

The basic frame ready!


I felt CJ would be impressed if the frame had some extra colors. So I used an alphabets scrapbook paper.
I made the below template on the backside of the scrapbook paper. The dimensions may vary based on the tissue box you use

Cut the template and glue it to the frame. Add a dress tag/ribbon to one side of the frame as shown below. It can be used to hold a marker and comes handy for carry along in handbag.

Slip in a writing practice sheet as shown below and start tracing/writing

We used different paper to trace/write.
Writing Practice sheet:

Newspaper/Magazine cuttings:

Alphabet tracing:

CJ Writing/Tracing


Erasing fun

CJ doesn't like the dress tags in her dresses, so she didn't like the dress tag on the board too:-) She asked mommy why did you put the tag there and she pulled it out. So I added a fancy red ribbon in the place of the tag and glued a piece of yarn to hold the pen while writing.
Ready to write!

Ready for Carry along!

The frame/pouch can be used as an I-Spy pocket too!

For some reason, CJ is fascinated by the dry erase markers. May be smooth feel while you write or May be the erasing activity with tissue makes her happy! So we have a set of dry erase markers and I just make sure the markers are low odor and non-Toxic.
CJ is quiet impressed with her new writing board. This morning she was writing, erasing, writing, erasing, more writing and more erasing! Isn't it fun! I started loving it, an inexpensive, $0 writing board!
This winter we have been sick with cold quiet often and we have lot of empty tissue boxes in store. Yay! we are recycling/reusing all of them and participating in the tissue box challenge!

Materials used
Empty Tissue boxGlue stick/Modpodge
Scissors
Vinyl bags/any clear plastic sheet(Vinyl bags work better)
Scrap book paper(optional)
Dry erase marker
Old dress tag/Ribbon(Optional)
Handwriting practice sheet/Old Magazines
Steps Overview:
Take an empty Tissue box

Pull out the sealed edges as shown in the below pictures


Cut along the line as shown below

You will get two parts, part1 with the opening and part2 - rectangular piece

Remove the plastic found around the opening on the top of the tissue box. It just comes off when we pull with hand

Cut a rectangle from the Vinyl bag/clear plastic sheet with dimensions little bigger then the rectangular opening of the tissue box.

Using glue stick, fix the clear sheet to the inside rectangular opening of the part1 as shown below

I added few strips of paper to the corners of the vinyl to give a neat finish

Place part2 rectangle piece over the backside of the part1 as shown below

Fix part2 in place by gluing the tabs as shown below

The basic frame ready!


I felt CJ would be impressed if the frame had some extra colors. So I used an alphabets scrapbook paper.
I made the below template on the backside of the scrapbook paper. The dimensions may vary based on the tissue box you use

Cut the template and glue it to the frame. Add a dress tag/ribbon to one side of the frame as shown below. It can be used to hold a marker and comes handy for carry along in handbag.

Slip in a writing practice sheet as shown below and start tracing/writing

We used different paper to trace/write.
Writing Practice sheet:

Newspaper/Magazine cuttings:

Alphabet tracing:

CJ Writing/Tracing


Erasing fun

CJ doesn't like the dress tags in her dresses, so she didn't like the dress tag on the board too:-) She asked mommy why did you put the tag there and she pulled it out. So I added a fancy red ribbon in the place of the tag and glued a piece of yarn to hold the pen while writing.
Ready to write!

Ready for Carry along!

The frame/pouch can be used as an I-Spy pocket too!


very clever! =)
ReplyDeleteWhat a great idea! I bet this will be used over and over again.
ReplyDeletegood idea....for kids
ReplyDeleteThat is a great idea! Will have to try this....
ReplyDeletePutti hates those dress tags too.
Aaah! I Have to say this is very clever and very fun and a great way to reuse a tissue box! Love it!!!
ReplyDeleteJudging the competition will be VERY hard indeed!! Yikes!
Thank you for linking to Kids Get Crafty!!
Maggy
This is a very excellent idea. My 4 year old can write all his letters, but has a hard time keeping words straight. Having a simple line box like that would probably help immensely.
ReplyDeletegreat idea!
ReplyDeleteLove this!! I am a new follower and I would love if you would like this up to Made by Little Hands Mondays!
ReplyDeleteHave a great day!
Michelle
www.delicateconstruction.blogspot.com
I love the write on/ wipe off idea - so simple and so clever.
ReplyDeletethis is such a creative and clever idea! thanks a lot for sharing! will be featuring this tomorrow!
ReplyDeleteI think you may really enjoy myblogs! Hey there I am your newest follower! Hope you stop by to see me. Your blog is way too cute!!
ReplyDeletehttp://bestpartofbelieveis.blogspot.com/
&
http://nikkisniknacks.blogspot.com/
~Nikki
Wath a great idea! I found something similarly somewhere,but I would have to buy it,and this way my daughter and I can make that and that's more interesting.Tnx for sharing!
ReplyDeleteGreat job!!!
ReplyDelete