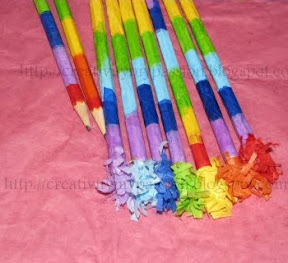
Inspired by the DIY Frilled pencils @ Maya made blog, we created our own personalized Rainbow pencils.
For Valentine's day, we made these beautiful rainbow pencils for CJ Teachers. The teachers bring them up in flying colors, so we presented Rainbow pencil to brighten their day. When we completed a set of rainbow pencils, I was totally obsessed by the frills. We created lots of them to go with the valentine swap cards for kids.
Now days we are using these frilled pencils for grocery lists, To-do lists. While writing the shaking of frills and the vibrant colors make be so happy. CJ also loves the rainbow colors and the frills. Delights an early writer too.. She practices Rainbow colors with the pencil saying Red, Orange, yellow, green, blue, Indigo and Violet.

The advantage of creating the rainbow pencil with kids is it's an easy way to teach them the colors of the Rainbow and the order of the occurrence. A fun filled and exciting project.
Materials Used:
PencilsTissue paper(in Rainbow colors) or Rainbow color crepe paper
Glue
Paint Brush
Flat Styrofoam vegetable container(For Mixing Mod-podge)
Mod-Podge or Glue stick
Measuring Scale or Ruler
Child safe Scissors
Fringe Scissors(Optional)

Steps Overview:
Measure the length of your pencil. We used pencil with erasers. The length of the pencil excluding the eraser was 7 inches.
Since our pencil measured 7 inches. We used 1 inch wide strips. The length of the strip depends on how u want the pencil to look. I used 6 inches long strip. So the pencil looks little thicker than the actual one. Start tearing strips of tissue papers.


If only I had known about the below product - Rainbow crepe paper strips, I could have saved time spent in cutting the strips. But anyways using strips of tissue paper is a fun way to use bits and scraps of them. If you have lots of scraps of tissue paper, they can be recycled this way.
I wanted to check how Mod-podge and glue stick work for this project. So we used two methods to wrap the paper around the pencil
Method 1: Glue stick
Apply glue stick to the length of the paper

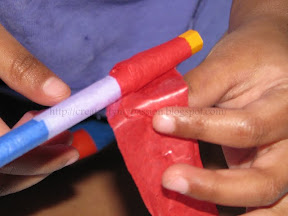
Wrap the glued paper around the pencil

Method 2: Mod Podge
Thin Mod podge by mixing a small portion of it with water in a Styrofoam container. Start from the free end of the pencil, Apply mod podge mixture to a small portion of the pencil. Take the paper strip and start wrapping. Apply mod-podge as and when required.

Wrap and glue the different colored strips in the pattern of rainbow colors.
Let it dry
Optional- When the pencil was dry, I coated a layer of Gloss-luster Mod-Podge to give a shiny finish to the pencil
PS: The Mod-podged pencil was easy to sharpen compared to the glued pencil
For the Frilled topper:
Use coordinating color of paper for the frills. Cut a strip of tissue paper/gift wrap paper,6 X 8.
Fold the paper in half as shown below.

Fold the paper in accordion fold

Cut fringes along one side(the free side or unfolded side) with normal scissors or use fringing scissors I have shown in the materials used. Unfold the accordion fold.

Apply glue to the non-fringe side of the frill

Wrap the glued frill around the eraser side of the pencil leaving the eraser hidden but available.

Let the frill dry.


We also made a Music notes pencil:-)

Frills, Frills

So Vibrant! With St. Patrick's Day coming up next month, the rainbow pencils may be a perfect Rainbow craft for St. Patrick's Day.


What a great idea! I am going to have to try this!
ReplyDeleteThese make perfect return gifts, lovely. Thanks for linking in the carnival.
ReplyDeleteThose are so cute. What a great idea. I'm your newest follower. I'm throwing my first link party today (Monday) it would be great if you would stop by and share your project.
ReplyDeletehttp://diyhshp.blogspot.com
What a beautiful and fun idea! They would be perfect for any party, gift bag, or stocking! Thanks for sharing! Kerri
ReplyDeleteWhat a fun idea. Thanks for joining the Winter Blues Wednesday link party. Thanks for sharing. Looking forward to seeing more of your projects.
ReplyDeleteWhat a cute idea! I am in the midst of planning a rainbow themed birthday party for my daughter. Might have to try this!
ReplyDeleteOh how cute! I love your pencil! Wonderful!!! Very creative and great for party bags too!
ReplyDeleteThanks for linking up to Kids Get Crafty!!
Maggy
What a cute idea! My daughter would love making these for her friends! Thanks for sharing.
ReplyDeleteHi, Esther! really pretty and colourful pencils.
ReplyDeletethanks for linking up last week! hope to see you again this week! have a nice weekend!
http://tosewwithlove.blogspot.com/2011/02/crafty-saturday-link-up-party-no-9.html
Esther, this project really makes me smile! The rainbow pencils are so cheery, beautiful and fun! I can see them making great gifts and party favors, with so many possibilities! Thank you for the tip on the crepe paper tape rolls!
ReplyDeleteThank you so much for linking up to another "A Little Birdie Told Me..."
Jenn/Rook No. 17
I love these pencils. They are so bright, fun, and cheery! I can't wait to make them with my little ones at home. This is such a fun craft and would be perfect for my "All Things Wonderful Link Party" that I have going on over at my blog right now. Hopefully you will get a chance to stop by.
ReplyDeleteThanks for sharing,
Shauna
myshaenoel.blogspot.com
So cute! Makes me want to write!
ReplyDeleteLove them, pinning..
ReplyDeletePopping in from 'Made with Love'
Angelique
These are so cute - I think they would make a perfect party bag present as well and maybe borrowing the idea for T's birthday in March.
ReplyDeleteThank you for linking to Made with Love
Cool idea! Had to Pin it! Am your newest follower!
ReplyDeleteThe pencils are too cute! This seems like it would make such a fun project too:)
ReplyDelete